
In the early part of the twentieth century a common construction technique used for factory buildings was that of a reinforced concrete superstructure veneered in brick. This provided plenty of strength, allowed for a vast expanses of windows to provide light, and produced an aesthetically pleasing building. This model represents such a building. It has been constructed using basswood strip stock, Monster Model Works etched brick sheet, Titchy windows and styrene. Read on and see how it was done.

This photo is an overview of the components that make up the wall assembly. The "concrete" columns are built up from stripwood. Monster brick sheet pieces and built up Tichy window sections fill between the columns.

Two distinct styles of columns are used in the construction. On the left is a corner column and on the right is the mid wall column. I use 1/4" square basswood for the body of the column and added a 1/8" square strip to support the brick sheet. The brick sheet is 1/8" thick so the combination of the support and sheet matches the column thickness.

This is a detailed view of the ends of the columns. The corner column (left) requires that the 1/8" square strips be glued in the manner shown to provide support for the brick sheet as it transitions around the corner.

This is the left corner and shows how the brick sheet is supported by the 1/8" square strips.
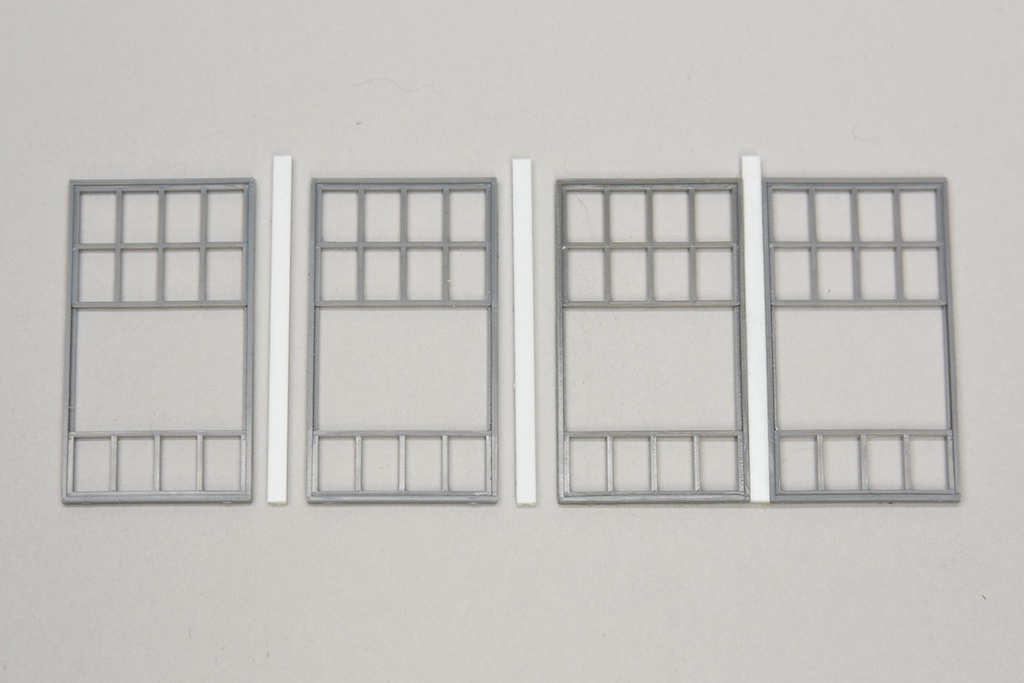
Four Tichy 8153 20 Pane Masonary Tilt Out windows are assembled into a single window unit. Styrene .040 x .060 strip is used as a spacer between the windows.


After assembling the window panel the width of the brick panels can be determined, they should be the same size. After cutting out the brick panels the wall assembly can begin. I started at the lower right corner using white glue to bond the parts. Use the window assemblies as spacers and continue to add the brick sheet. Make sure your parts are square to the corner edge.

This shows the left side while the glue sets. Allow the glue to completely dry then add the mid wall columns to each assembly. Allow these to dry and then add the next set of brick panels.

This is the completed wall section. The windows are not glued in, they function as spacers.

The left wall is bonded to the corner. 1/8" square stripwood is added along the top edge of the window opening to support the roof. An additional strip is added to the back edge set back 1/16". This provides a glue point for the black matt-board rear wall.

The street side wall is assemble using the same process as the track side wall. Again a 1/8" wood strip is added along the back edge of the wall. In this case it not only is used to support the back wall but it provides support for the brick panels.

Using some scrap brick sheet an extension is added to the top of the street side wall. It overlaps the top of the corner post. An additional small piece of brick was added extending back to cover the top of the column.

The sub-roof is cut from 1/16" basswood sheet. Use the edge of your ruler to mark the locations of the notches that need to be cut to clear the columns. Bond the roof in place and then add a strip of 1/4" square stripwood along its back edge. Make sure it is set back 1/16" from the rear edge.

Monster 1/32" thick etched brick is used to make the column covering. To enhance the relief of the pilasters add a 1/32 x 1/4 length basswood to each column, then apply the strip of 1/4" wide brick sheathing. The above photo shows 45 degree bevel added to the sheet for the corner columns. This was created by sanding. Measure the corner column width (1/4 + 1/32), transfer to the beveled edge of the sheet, and slice off. Bond the strips to the corners, make sure you match up the bond rows and the beveled corner.

This is the rear wall corner.

This is the street side wall corner. The top of the street side wall has had a 1/32" filler added to match the corner column. The width of the covering brick sheet extends from the rear edge all the way across the column (taper this edge). This eliminates a vertical seam at the interface of the cornice and column.

To enhance the appearance of the model use a hobby knife to add mortar lines to the side of the brick veneer and filler strip.

This is the model ready for painting.

Paint the interior of the structure black, mask the window openings from the outside to prevent over spray onto the exterior surfaces. When interior is dry mask the openings from the interior and spray the exterior. Rust-oleum Cinnamon is a good base color. When the paint is dry add mortar to the rear and track side walls (wash of Liquitex modeling paste). The street side wall has not had "white" mortar applied as this mortar would have been colored to match the brick. Leaving the joints alone effectively simulates this.

The exposed floor edge is simulated using scale 2x12 basswood strips. The window sills are scale 4x6 basswood strips. Paint the strips a concrete color and then apply above and below the window openings. Paint the 1/8 square supports which are in the window openings black, this will hide them from view behind the windows.

The street side window trim is more decorative than that on the utility sides of the building. Using some Northeastern doll house window trim material allows this to be effectively simulated. The lower strip will be used as is to simulate the floor edge.

The sill is created by trimming off the ogee curve from the upper strip in the above photograph.

This is how the trim will be applied to the windows after painting.


Use basswood strip segments to create concrete pilaster and cornice caps. Paint a concrete color after installation.

Coat the sub-roof with matte medium and then lay a single layer of facial tissue into the wet medium. Pat down with a soft brush, do not pull the brush over the surface. When dry trim off the excess tissue.

Pikestuff Cap Tiles #541-1008 are used to finish off the top of the brick wall sections. They are painted a terracotta tone using Vallejo orange brown.

To allow the cap to fit flush on the wall top the overhanging edge cast onto the bottom of the part needs to be removed from one edge.

The column tops are painted concrete color and then the cap castings are bonded in place. use canopy glue to bond the plastic to the wood.

The loading dock is built up from 3/32" basswood sheet for the deck and 1/8" basswood for the piers. The face of the pier is tapered. Notch the deck to fit around the wall pilasters and then bond the piers to the deck. When dry paint the dock concrete color.

Apply white glue to the back edge of the deck and piers. Align the piers with the bottom of the wall and clamp in position until the glue has set.

The freight doors are built up from styrene sheet and strip material. Scribe .040 thick sheet at two foot intervals to simulate the roll up doors. Add .040 square strip around the sides and top of the door sheet. Add a .040x.100 strip at the center. Add .015x.030 strips around the inside of both door openings. Bond a .010x.100 strip across the top of the entire door assembly.

Add a .020 thick spacer along both sides of the rear of the door assembly, these will be glued to the 1/8"square strip wood segments in the door opening.

The doors are painted using Vallejo Silver Gray. Once dry bond them in place using canopy glue.

Lay out the lettering for your signage and determine its overall size. Paint the brick black to correspond with the size of the sign. When dry apply your lettering.

The dock is covered with a canopy. The first step is to determine the width of the canopy. Use tape to mark the height of the canopy edge from the ground.

Measure from the wall to your tape to establish the width of the canopy.

The base for the canopy is also constructed from styrene, this is the underside of the roof. The roof base is .020 sheet. Three .030 square strips are added lengthwise. Next, four .100 channels are placed across the roof. Paint everything black.

Cut Northeastern corrugated sheathing into scale 30" wide pieces and bond them to the styrene roof base. Paint shades of gray.

Use an old paint brush to blotch on rust toned paint. Model Master raw umber and Vallejo orange brown mixes.

Dry brush silver gray over the rust.

The Tichy cut glazing needs to be narrowed slightly to fit in the window castings. To stabilize the glazing when cutting, stick it to some masking tape. The tape has been secured to the cutting surface sticky side up.

This is a closeup of the interior of the window casting. Note that there are small extensions along the edge of the pivoting pane. These protrude into the glazing area on the stationary panes and interfere with the placement of the stationary glazing.

To clear the extensions, trim off the corners of the glazing as shown. Dip the glazing in Future floor wax, tip off excess, and apply to the window frame and allow to dry. Once dry lightly dust the exterior and interior of the window assemblies with a dark powdered pigment (Debenllc) to create grime.

After glazing all of the window assemblies add them to the building. Sand/file the outer edges of the window assemblies to obtain clearance to place them in the window openings. Use pigments to weather the exterior of the building.

The canopy is supported by four lengths of .020 wire. These supports rest in the channels on the underside of the roof. Make a slight bend in the wire and bond in the wall. Adjust the angles of the supports so that they match. Bond the canopy to the supports.

The canopy hangers are simulated using .015 wire. The wall attachments are Grandt 5096 NBW.

Bond the NBW to the wall aligned with the channels on the canopy. Drill a hole through the NBW to accept the wire. Bond the wire in place.

The wires should be a little longer than needed. They are then trimmed to rest on the roof.

The final step is to add the matte board backing. Apply glue around the supporting strips and clamp the backer in place until dry. Make sure that you avoid clamping to the windows along the top edge.
Really enjoyed your modeling with MMW sheets, as I have some scratch building to do with the same. My question is how to cut out sections for windows. I only need to cut out about 5 windows and a freight door, but being an 1/8" thick, I am struggling on the technique to do so. The large sections as you are doing would be easy for me on my micro saw from Jim Barnes, and am wondering if that might also be a good choice to use and then bring back sections in the manner you have to leave the openings for the windows etc. Thank you for sharing.
ReplyDelete